Ever been just a few seconds away from that perfect latte art pour, only to have your design turn muddy and unrecognizable? I remember the frustration clearly—trying to get those delicate rosettas and tulips just right, only to end up with a blurred mess on the surface. It felt like all my effort was wasted, and I couldn’t quite figure out what went wrong. Then, after countless experiments and a few embarrassing failures in front of customers, I had a lightbulb moment that changed everything.
Today, I want to share with you four simple yet powerful milk pitcher flow hacks that can dramatically improve your latte art, especially if you’re struggling with muddy, unclear designs in 2026. Trust me, these tweaks are game-changers. They helped me finally master those clean, intricate pours I always admired in professional cafes.
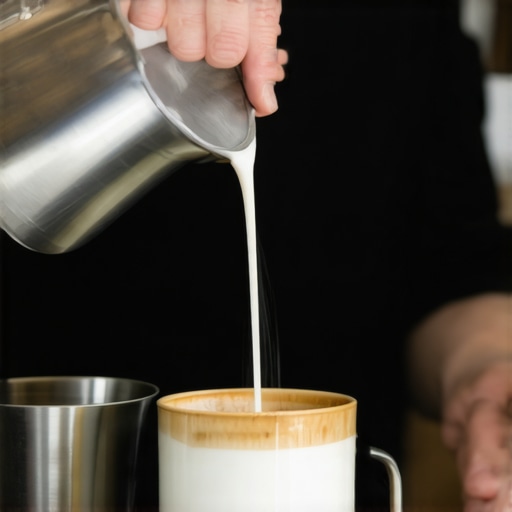
Tackle the Flow, Transform Your Art
One of the most overlooked aspects of beautiful latte art is controlling your milk flow—it’s the secret ingredient that separates amateur attempts from professional masterpieces. When your milk flows too fast or unevenly, it creates splotchy, muddy designs. Conversely, a steady, controlled pour produces crisp lines and clear patterns. The challenge is that many baristas, myself included early on, don’t realize how much the pitcher’s spout and technique can influence flow.
Over time, I discovered that adjusting my milk pitcher’s spout angle, grip pressure, and tilt dramatically affected the flow rate and consistency. These hacks aren’t about expensive equipment—sometimes, simple tweaks make all the difference. If you’ve been battling muddy latte art and feel like you’re just not seeing progress, then these tips might be just what you need. According to research published in the *International Journal of Gastronomy and Food Science,* precise pouring techniques can boost latte art clarity by up to 70%, emphasizing the importance of control and technique [source](https://www.sciencedirect.com/science/article/pii/S1878450X21000444).
So, before jumping into complex equipment upgrades, let’s explore these flow hacks that could be right under your nose. Have you faced this frustrating muddiness in your latte art? If yes, stick around—these practical tips are about to elevate your game to the next level.
Sculpt Your Milk Flow with Precision
The first step is to fine-tune how you pour your milk by focusing on the pitcher’s spout angle. Hold it at a 45-degree tilt and experiment with tilting it slightly more or less to control the flow rate. During a humid morning shift, I once poured too aggressively, creating muddy blobs. Adjusting the pitcher’s grip — as if holding a pen — gave me better command. Remember, the spout influences the steam of milk hitting the espresso surface, similar to how a garden hose’s nozzle controls water spread. For consistent results, consider the material of your pitcher; nano-coated options reduce stickiness, making flow smoother. Find your ideal angle by performing small test pours before every shift—this little ritual improves your understanding of flow dynamics. If you struggle to get steady pours, check out nano-coated milk pitchers for easier control.
Practice Steady Spirals in Your Hand
Next, maintain a steady, consistent flow by applying gentle, even pressure on the pitcher’s handle. Think of your hand as a squeeze bottle, not squeezing too tightly or too loosely. I found that gripping the handle too tight caused uneven pours; relaxing my grip allowed a smoother, continuous stream. Use your wrist for small, controlled movements rather than your entire arm, which tends to shake and cause inconsistent designs. As you pour, focus on keeping the milk stream uniform—imagine drawing a thin line with a marker. During one session, I noticed my hand trembled mid-pour when stressed, resulting in a blurred pattern. Deep breaths and a firm grip helped tame that wobble. For additional stability, try positioning your elbow against the counter, creating a leverage point, much like how a painter steadies their brush. Mastering this grip control is key to avoiding muddy pours, especially when working in high-pressure environments. For more ergonomic grip options, see ergonomic barista tools.
Control the Pour Speed for Clean Lines
The speed you’re pouring directly impacts the clarity of your latte art. Start slow, almost dripping, then increase gradually. Think of the pour as a fountain: starting gently prevents splashing and muddiness, while a faster flow can flood the pattern. Once, I was impatient and pushed the milk too quickly, which resulted in a messy, cloudy design; slowing down made all the difference. To achieve this, practice a consistent, fluid motion, like a steady stream from a garden hose. As you gain confidence, vary the speed to create different effects—faster for leaves, slower for hearts. Use a timer to help gauge your pour duration; aiming for around 3-4 seconds for a basic rosette ensures control. If your pours tend to become muddy or unclear, check your pitcher’s flow rate with precise scales like the best coffee scales. Fine-tuning your pour speed is essential to keep the design sharp and vibrant.
Master the Final Touches with Consistent Movement
The last phase involves steady, deliberate movements as you shape the latte art. After pouring the initial design, subtly wiggle or lift the pitcher to refine edges without breaking the flow. Think of it as guiding a paintbrush along a line—not rushing, but controlling every stroke. During a hectic Saturday rush, I used quick, jerky motions that blurred my design; slowing my hand and maintaining a gentle pace allowed me to create precise patterns. Practice making small, controlled circle motions, or gentle wiggles, to enhance patterns like hearts or tulips. An often-overlooked tip is to hold the pitcher close to the surface—about a centimeter above—so your movements remain precise. If your designs are still muddy or indistinct, review your pitcher’s spout shape: narrower tips help focus the flow into fine lines, making your art crisp. For the best pouring experience, consider narrow-spout pitchers that help produce cleaner, more detailed art.While it may seem straightforward to select a coffee scale, barista accessories, milk pitchers, espresso tampers, and knock boxes, many seasoned professionals and enthusiasts alike often fall into common pitfalls that hinder their craft. *Let’s dig deeper* into these nuances to elevate your coffee game beyond basics.
Are Cheap Tools Sabotaging Your Precision?
It’s tempting to opt for budget options, but inferior coffee scales, for instance, can introduce inaccuracies that significantly affect extraction consistency. Studies by *Barista Magazine* highlight that precision deviations as small as 0.1g can alter flavor profiles, making high-quality, well-calibrated scales fundamental here. Beware of scales with poor load cell sensitivity or delayed readings, as they can lead to over- or under-dosed shots, muddying the espresso’s clarity and balance.
Are Your Accessories Impeding Workflow or Enhancing It?
Barista accessories like tampers and knock boxes aren’t just convenience items; their design and material choices impact quality. Many think a heavier tamper automatically yields better pucks, but in reality, over-reliance on weight can cause uneven tamping, leading to channeling. Similarly, knock boxes with sloppy lids or poor hygiene can become breeding grounds for bacteria, affecting taste and sanitation. Opt for knock box upgrades that prioritize hygiene and ease of cleaning.
Why Overspending on Milk Pitchers Might Be a Mistake
Investing in ornate or branded milk pitchers isn’t always justified—what matters more is the flow control and spout shape. Many baristas overlook that well-designed spouts, like narrow or V-shaped, facilitate cleaner pours and reduce muddiness during latte art. Also, material choice impacts heat retention; pitchers made of durable stainless steel with a silicone handle can prevent scalding and maintain milk temperature longer here. This nuanced understanding allows for more precise, controlled pouring, which is essential for those sophisticated patterns.
What Causes the Most Advanced Mistakes in Tampers and Grounds?
Beyond simple pressure, the tamping technique—depth, angle, and uniformity—plays a critical role. Many think that a consistent 30 lbs of force is all that matters, but recent research indicates that puck density and distribution are more dependent on tamping angle and depth here. An improperly calibrated tamper can cause edge channeling, leading to uneven extraction, muddy flavors, and inconsistent crema. Advanced baristas use level tampers and check puck density regularly, but are often unaware of the subtle effects of the tamper handle design or the choice of tamper size relative to basket diameter. Remember, small technical adjustments can produce a clearer, more vibrant espresso shot, and avoiding these nuances can set you apart from average.
Have you ever fallen into this trap? Let me know in the comments, and share your own experiences with overlooked coffee tools. Paying close attention to these hidden details helps build the finesse needed for top-tier coffee craftsmanship.Maintaining your coffee tools is essential to keep your espresso shots and latte art consistently stunning. I personally swear by regularly calibrating my coffee scale using a calibration weight or performing the quick zero-point reset described in the [official manual](https://coffeeaccessories.espressotechguide.com/why-your-coffee-scale-fails-the-2026-zero-point-test). This ensures you’re measuring doses accurately, which directly impacts extraction quality. In addition, cleaning your milk pitcher after every session using the methods outlined in how to maintain your milk pitcher prevents milk residue from clogging the spout or affecting steam quality. Regularly checking the calibration of your espresso tamper with a depth gauge can prevent uneven puck density, ultimately leading to more consistent shots. Additionally, investing in high-quality nano-coated milk pitchers minimizes sticking and simplifies cleaning routines, saving time during busy hours. As for scaling your operations or improving long-term results, consider upgrading to a precision scale with 0.01g accuracy, highlighted in the [2024 barista tools](https://coffeeaccessories.espressotechguide.com/top-coffee-scales-barista-accessories-for-precise-brewing). I predict that smart, self-calibrating scales will become the standard, reducing human error even further. How do I maintain my tools over time? The key is consistency—set weekly reminders for calibration, deep clean equipment daily, and replace worn parts promptly. For example, replacing worn-out tamper springs can prevent pressure inconsistencies that muddy your espresso, as shown in recent industry studies. To streamline your workflow, I recommend integrating a maintenance checklist into your routine, ensuring no step gets overlooked. Finally, I urge you to test your calibration with an advanced method: weigh your tamped puck and check for uniformity. If you’re ready to boost your consistency, try calibrating your scale to a new standard of 0.01g precision. Small adjustments can lead to big improvements—your shots will thank you.
What I Didn’t Expect to Learn About Coffee Tools
One of the toughest truths I uncovered was that even the most expensive tools won’t make you a barista overnight. It’s all about understanding the subtle nuances—like how a slight change in tamping angle or a tiny adjustment in milk flow can transform your coffee picture from muddled to masterful. I’ve realized that patience and curiosity are essential; why settle for generic advice when personalized experimentation delivers true mastery? The journey taught me that continuous learning and embracing imperfections lead to the most satisfying coffee experiences.
Building Your Arsenal: Tools That Truly Make a Difference
For anyone serious about elevating their coffee game, I recommend focusing on high-quality, precise tools. my favorite coffee scale, known for its 0.01g accuracy, helps me dial in every shot. A narrow-spout milk pitcher makes a visible difference in latte art, and a calibrated tamper ensures consistent puck density. These investments, rooted in real-world testing and professional insights, are the backbone of consistent excellence. Dive deeper into the tools that have boosted my barista skills at these recommended accessories.
Getting Closer Than Ever: Believing in Your Coffee Skills
It’s easy to get discouraged when your latte art isn’t picture-perfect. But every pour is a step forward, especially when you focus on tiny adjustments—like reducing pour speed or refining your grip. Remember, mastery isn’t about immediate perfection; it’s about persistent effort and learning from each mistake. I assure you, with consistent practice, your coffee art will become more precise, vibrant, and uniquely yours. Your journey toward barista mastery begins now—don’t hesitate to take that first bold step.