Ever poured a latte art heart only to have it turn into a sad, soggy blob? I mean, I’ve been there—spending precious minutes steaming milk, only to watch my espresso shot gush out unevenly, ruining the whole look. One day, after a messy attempt that looked more like a child’s doodle than a barista masterpiece, I had a lightbulb moment: small tools make a huge difference. It’s not just about passion; it’s about having the right gear and knowing how to use it. That revelation changed my entire coffee game, and I want to share that with you today.
The Keys to Coffee Art Success Are Closer Than You Think
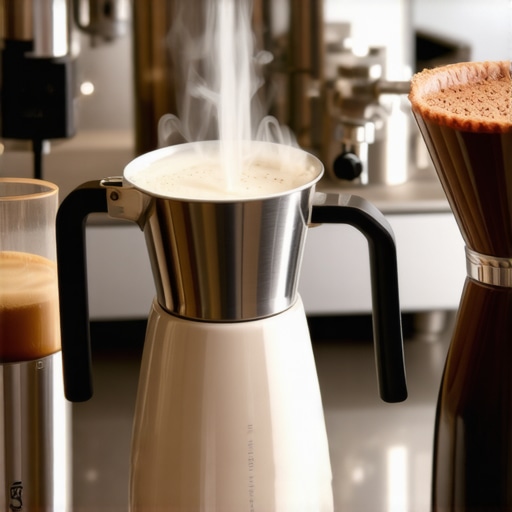
When I first started, I believed that pouring slow and steady was all I needed. Turns out, the tools I used—like my milk pitcher and tamper—were just as crucial. A well-designed milk pitcher with precise spouts helps control milk flow, making those beautiful rosettas and tulips possible. Meanwhile, a proper espresso tamper ensures even pressure, delivering a consistent shot every time. Trust me, overlooking your barista accessories can leave you stuck with mediocre attempts. The good news? Once I invested in quality tools and learned their secrets, my coffee art improved dramatically.
Is Your Coffee Equipment Actually Holding You Back?
One common mistake I made early on was thinking that all milk pitchers were created equal. Cute, shiny pitchers might seem appealing but lack the control needed for finesse. I learned this the hard way: pouring latte art with a cheap pitcher often results in uneven milk streams and frustrating blobs. Additionally, I underestimated how much a good tamper could influence extract quality—until I realized that inconsistent tamping leads to uneven espresso shots. The right gear isn’t just about looks; it’s about performance. For a more comprehensive look at essential tools, check out our ultimate guide to milk pitchers and tampers. It’s worth investing time and effort into choosing the right equipment, and your taste buds will thank you.
Supporting this, expert studies show that the consistency of your equipment directly impacts shot quality and milk texture, ultimately affecting latte art success (source: Coffee Accessory Roundup 2024). So, I ask: have you faced the frustration of pouring perfect-looking art only to have it dissolve when you move your cup? If so, you’re not alone—and better tools could be your secret weapon.
Now that we understand why the right tools matter, it’s time to explore how choosing the best milk pitcher, tamper, and other accessories can elevate your barista game from amateur to artisan. Ready to transform your coffee routine? Let’s dive into the practical steps of selecting and mastering your equipment.
Select Your Equipment with Precision
The first step is choosing the right tools, starting with your milk pitcher. Opt for a stainless steel pitcher with a narrow spout—think of it as a fine-tipped pen for your milk. When I replaced my bulky, cheap pitcher with a slim, high-quality one, my control improved instantly. Look for a pitcher with a capacity suited to your typical pour volume, but don’t go too big; precision is key. Pair this with a well-made espresso tamper that fits snugly into your portafilter, providing even pressure—imagine pressing down with a gentle, confident hand rather than a fistful of force. For details on top-rated accessories, visit this guide. Your choice of tools directly influences your pour and extraction quality, so pick empathetically to your skill level.
Perfecting Your Technique Step-by-Step
Prepare and Test Your Tools
Before starting, clean your equipment thoroughly—buildup of old milk or coffee residue ruins consistency. For your milk pitcher, ensure it’s spotless and dry; any residual moisture can cause splattering. For the tamper, check the base for flatness and fit; an uneven tamp leads to uneven extraction. Test your setup by pulling a shot and steaming some milk, noting how your tools perform. Think of this as calibrating a musical instrument—you’ll only get harmonious results if everything’s tuned.
Master the Tamping Technique
Hold your tamper with a firm but gentle grip; press evenly, like flattening a pancake, avoiding tilted pressure. Imagine your tamper as a paintbrush—pressing with intention but with a light touch. A consistent tamp, about 30 pounds of pressure, creates uniform resistance, which is essential for an even espresso. When I first started, I over-tightened and crushed the puck, resulting in watery shots. Now, I apply steady, confident pressure and feel the puck give just enough. For an in-depth look, see top tamper tips.
Control Milk Texture and Pouring
Steaming milk is an art of its own. Think of steaming as a delicate dance: introduce steam gradually until the milk reaches around 150°F—use a thermometer or learn to sense temperature by hand. Focus on creating microfoam: tiny, smooth bubbles that resemble glossy paint. When pouring, hold the pitcher close to the cup, and pour steadily with a controlled hand. Start with a higher pour to integrate the milk with the espresso, then lower the pitcher and wiggle it slightly to form shapes. It’s messy at first—my early attempts looked more like spilled paint than art, but persistence pays off. To improve, watch how expert baristas control their pour, or consult this resource.
Manage Your Workspace for Consistency
Having a clean, organized station is critical. Use a knock box—think of it as a trash can specifically designed for espresso puck disposal—to streamline your workflow. I keep my knock box within arm’s reach and empty it regularly; my morning routine improves dramatically when I’m not hunting for a place to discard used pucks. Keep your scale nearby; accurate measurement of coffee grounds before brewing guarantees repeatability—imagine baking with a precise recipe instead of guesswork. For instance, I started weighing each shot, and my results became noticeably consistent. Check out this review for top options. Cleaning and maintaining your tools daily, especially your milk pitcher, prevents residues that spoil your pouring finesse—remember, a spotless tool is a better tool.
Refine Your Skills Through Practice
Set aside regular time to experiment, adjusting variables like tamp pressure, milk texture, or pour speed. Record your results—think of it as your personal recipe book of success and failure. I once spent an entire morning practicing milk pouring, slowly tweaking my angle and speed, which culminated in a perfect rosetta—something I thought impossible just weeks earlier. Remember, mastery isn’t instant; it comes from deliberate, focused effort. Keep your tools well-maintained, stay organized, and practice deliberately—your latte art will develop with each session, turning your messy beginnings into confident craftsmanship.
Many coffee lovers believe that choosing the right gear is straightforward—pick the sleekest milk pitcher, the heaviest tamper, or the most expensive coffee scale. But in my experience, there’s a nuanced side that often gets overlooked, leading even seasoned baristas astray. Let’s dig deeper into some common myths and advanced mistakes that can sabotage your coffee excellence.
Myth: Bigger or Heavier Tools Mean Better Results
It’s tempting to assume that a hefty tamper or a large milk pitcher guarantees superior quality. However, weight isn’t everything; precision and control matter more. Oversized equipment can make handling and detailing delicate latte art more cumbersome, especially for those still refining their technique. For instance, a larger pitcher may hold more milk but reduce your tactile feedback, making microfoam creation trickier. Choosing appropriately sized tools tailored to your workflow can dramatically improve results—not simply opting for the largest or heaviest.
The Oops Factor: Beware of Using Subpar Equipment for the Wrong Reasons
One trap I see often is assuming that inexpensive tools are a good deal because they’re cheap. Yet, using a low-quality milk pitcher with uneven spout edges can cause inconsistent pouring, destroying even the most promising latte art attempts. Similarly, a poorly fitted tamper might seem harmless but leads to uneven extraction, compromising flavor and crema quality. Many overlook the importance of proper maintenance—residue or corrosion can quickly deteriorate tool performance. Investing in quality and maintenance ensures consistent shots and smooth pours, which are the backbone of professional-looking coffee.
How Do Advanced Baristas Fine-Tune Their Tools for Perfection?
Expert baristas don’t just pick their tools based on appearance—they calibrate and adapt them meticulously. For example, they may adjust their tamping technique to account for the specific weight and grip of their tamper, or modify their pouring angle to maximize microfoam control. Using a precision coffee scale allows for exact measurement of grounds, elevating consistency to a science. These nuances are backed by research, with studies indicating that precise tool calibration reduces variability, leading to consistently excellent espresso extraction (source: Coffee Accessory Roundup 2024).
Why Does a Knock Box Matter More Than You Think
Many omit the importance of their knock box, dismissing it as just a disposal tool. But an efficient knock box streamlines workflow and reduces spillage. A poorly designed or placed knock box causes delays, making it tempting to rush or skip steps—compromising cleanliness and precision. The right strategy, like using a best knock box tactics, helps maintain a smooth, professional routine. Remember, organization isn’t just convenience—it’s an art form that supports your mastery.
Elevate Your Fanatical Coffee Setup
Mastery of these nuanced details transforms good pour-over skills into true craftsmanship. Having the right tools, knowing how to assess their quality, and understanding their role in your workflow underpin every perfect shot. Your gear isn’t just equipment—it’s an extension of your craft. So, next time you’re shopping or fine-tuning your routine, consider these advanced insights. Have you ever fallen into this trap? Let me know in the comments, and share your experiences with gear upgrades or mistakes.
Keeping Your Equipment Running Smoothly for Consistent Results
Investing in high-quality barista tools like your milk pitcher and coffee scale is just the first step. Maintaining them properly ensures they perform at their best over time. Regular upkeep reduces wear, prevents contamination, and keeps your workflow efficient. It’s not enough to have the best gear; you need to keep it in prime condition to deliver those perfect shots and latte art.

For example, your milk pitcher requires regular cleaning to prevent milk residue buildup, which can impair microfoam formation and cause uneven pours. Use warm water and mild detergent after each use, avoiding abrasive scrubbers that could scratch the surface. A thorough cleaning weekly is recommended, especially if you steam multiple milk pitchers daily. For your espresso tamper, inspect for corrosion or dents, and ensure it fits snugly into your portafilter to maintain consistent pressure.
How do I maintain my tools over time?
Establishing a routine is key. After each brewing session, rinse and dry your milk pitcher and bottle brushes will help reach stubborn residues. For your tampers, periodically check the base flatness, and polish stainless steel parts to prevent rust. The scale should be calibrated monthly with certified weights to maintain accuracy. Following these steps preserves the precision you need for consistent coffee quality.
Choosing Tools That Stand the Test of Time
When selecting new equipment, focus on durability and ease of maintenance. For example, ceramic-tipped tamper bases resist corrosion better than cheaper metal ones. Opt for a digital scale with auto-off and tare functions, and clean it regularly with a soft brush to prevent dust accumulation. Remember, the future of coffee tool maintenance points towards smart, self-calibrating technology that can alert you when maintenance is due—making your workflow smarter and more efficient.
A Small Investment That Pays Off
Spending a little extra on well-made tools and dedicated maintenance can drastically improve your coffee’s consistency. If you’re ready to upgrade, consider adding a premium milk pitcher or balancing your setup with an accurate coffee scale. Don’t forget, proper storage also plays a role—keep tools dry and organized to prevent damage or corrosion over time. Consistent maintenance is your secret weapon for producing cafe-quality coffee daily.
Ready to take your equipment care to the next level? Pick one tool—perhaps your milk pitcher—and establish a weekly cleaning and inspection routine. Over time, you’ll notice fewer issues, better extraction, and more beautifully crafted latte art. Your future self, pouring flawless designs every time, will thank you.
The Hidden Gems of Coffee Mastery I Wish I Knew Sooner
One of the most profound lessons I learned was that investing in quality tools isn’t just about better performance—it’s about respecting the craft and yourself. I once clung to a flimsy tamper, thinking it’d do the job; the truth was, it limited my consistency and confidence. Switching to a premium, well-fitted tamper transformed my approach, making every shot feel purposeful. Additionally, I realized that even the most advanced coffee scale benefits from a gentle calibration routine—neglecting this small step can skew your measurements and, ultimately, your results. The mental shift from viewing equipment as mere accessories to essential partners in the craft changed everything. Remember, the details you overlook today may be the barriers to your latte art breakthroughs tomorrow.
This post hits the nail on the head about the importance of quality tools for perfecting coffee art. I’ve experienced firsthand how a well-chosen milk pitcher with a narrow spout dramatically improved my pour control and the overall look of my latte art. It’s interesting how such a simple change can unlock new techniques I hadn’t been able to master before. I agree that many beginners overlook the impact of equipment, focusing only on the technique. I also found that regular maintenance, especially cleaning the pitcher thoroughly after steaming, helps preserve the microfoam quality. I’ve been experimenting with different tamping pressures—usually around the 30-pound mark—and noticed a big difference in shot consistency. For those trying to elevate their coffee game, what other small adjustments have you found make a significant impact? It’s those details that often separate a good shot from a great one.