I remember the first time I tried to prep my espresso shot after a long day—clumsy, rushed, and ending with a disastrous mess on my countertop. That sinking feeling when your knock box slips, skids, or worse, your delicate coffee mug topples over because your old, plastic one isn’t cutting it anymore. It was a lightbulb moment: I needed a better solution, and surprisingly, the answer was right in front of me—rubber-bottom knock boxes. Once I made the switch, everything changed.
Discovering the Rubber-Bottom Advantage
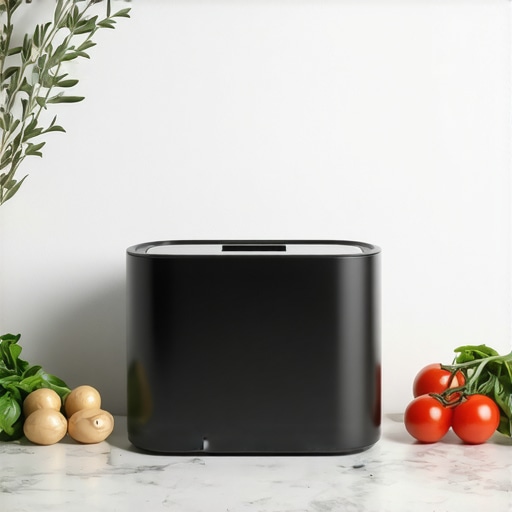
In my early days of home brewing, I dismissed knock boxes as just another accessory. That was a mistake. I realized that the rubber bottom isn’t just a minor detail; it’s a game-changer. Rubber provides superior grip and noise reduction, meaning my knock box stays put during high-volume mornings, and I don’t wake up the entire household every time I clean my portafilter. Plus, it’s gentle on my counters, preventing scratches and dents I used to get with metal or plastic knock boxes.
Through personal experience and some research, I learned that rubber-bottom knock boxes are becoming the go-to choice for serious home baristas and even professional cafes. They’re durable, slip-resistant, and much easier to clean—features that can significantly elevate your daily routine. If you’re tired of slips or annoying noise, it might be time to give them a try. Want to see how to choose the best model? I’ve got you covered. Check out best knock box strategies to streamline your workflow.
Is all the hype about rubber-bottom knock boxes justified?
Well, I made a common mistake early on: I bought a cheap knock box without checking the base material. It ended up sliding across my counter, turning my morning espresso ritual into a circus act. This rookie error taught me the importance of quality and design—features that rubber bases deliver naturally. According to industry experts, the non-slip feature is a primary reason these knock boxes are outpacing traditional designs in 2026. If you’ve faced slipping or noise issues, you’re not alone. Let’s explore what makes these knock boxes so effective and how you can select the right one for your setup.
Now that we understand why this upgrade matters, let’s dive into the practical steps of choosing and maintaining your perfect rubber-bottom knock box—so your mornings become smoother, quieter, and more enjoyable.
,
Secure Your Knock Box Properly
Begin by selecting a rubber-bottom knock box that matches your countertop’s size and grip needs. When I first upgraded, I placed the new rubber-bottom model on my granite countertop and realized instantly how much more stable it became during my morning rush. To ensure it stays in place, test for slip by applying gentle pressure; if it shifts or slides, consider adding non-slip pads or choosing a model with a heavier base. This secure footing prevents accidents and saves you time cleaning up spilled espresso grounds.
Position for Optimal Accessibility
Place your knock box within arm’s reach of your espresso station. For my setup, I positioned it directly beside my espresso machine, which streamlined my workflow and reduced unnecessary movements. Think of your knock box as the finishing point of your shot—if you have to stretch or turn awkwardly, it slows down your process and can lead to spills. Consistent placement increases efficiency and minimizes messes, especially during busy mornings.
Maintain Noise and Vibration Control
Rubber bottoms are excellent for dampening sound and vibrations when you knock out used grounds. During my initial testing, I knocked out shots without paying attention to my base, causing a loud echo and slight countertop shake. Once I replaced my old plastic model with a rubber-bottom one, knocking became noticeably quieter, creating a calmer environment. To further reduce noise, try knocking with controlled force, ensuring grounds fall gently into the bin without excessive impact. This practice keeps your space peaceful and reduces wear on your equipment.
Implement Cleaning Routines
Regular cleaning prolongs your knock box’s lifespan and maintains hygiene. After each use, rinse out the rubber bottom with warm water and wipe the exterior with a damp cloth. Every week, I deep-clean mine by removing the rubber insert and scrubbing away coffee grounds and oils—preventing buildup that can cause slipping or odors. For a thorough clean, check the manufacturer’s instructions, but generally, avoiding abrasive cleaners preserves the rubber’s grip and flexibility. A well-maintained knock box not only looks good but also functions reliably for years.
Enhance Stability with Additional Measures
If your knock box still slides or shifts despite a rubber bottom, consider placing a damp cloth or silicone mat underneath. During a busy weekend morning, I added a silicone pad beneath my unit, which increased friction even further. This small step prevents accidental movement when knocking, allowing you to work quickly without distraction. Think of it as anchoring your space to keep your rhythm smooth and uninterrupted.
Adopting these straightforward steps transforms your knocking experience, making it safer, quieter, and more efficient. The difference rubber-bottom knock boxes bring is tangible—improving your coffee routine one knock at a time. For a broader selection and additional tips, check out best knock box strategies.
Many home baristas and even seasoned professionals often get caught up in misconceptions about key accessories like knock boxes, espresso tampers, milk pitchers, and coffee scales. Let’s dig deeper to uncover what most people overlook or misunderstand, ensuring your equipment truly enhances your brewing skills.
One widespread myth is that all knock boxes are created equal. Everyone says a sturdy, stylish knock box is enough, but in my experience, the type of base material—particularly rubber versus plastic—makes a significant difference in stability and noise reduction. Choosing a model with a high-quality rubber bottom isn’t just about aesthetics; it’s about preventing slips and reducing wake-up-your-neighbors noise during early mornings. Many forget to verify the non-slip properties before purchasing, which can lead to frustration. For an in-depth look, check out best knock box strategies.
Why does pressure calibration matter in espresso tampers?
Many believe that a tamper’s weight alone guarantees a good shot, but advanced users understand that a calibrated, consistent tamping pressure—typically around 30 pounds—is vital for extraction precision. Relying solely on feel can be deceptive, especially when hand strength varies. An improperly tamped shot often results in under or over-extraction, leading to bitter or sour flavors. Investing in a tamper with adjustable depth or pressure calibration can elevate your espresso game significantly. For detailed calibration techniques, explore the right tamping tools.
Another overlooked nuance involves milk pitchers. Many assume that any stainless steel pitcher will produce perfectly textured milk, but the shape and spout design dramatically influence latte art quality. Shaping the lips of the pitcher or selecting models designed for controlled pouring greatly improves artistry. This is especially true for beginners who often struggle with pouring techniques. To master milk steaming and pouring, see milk pitcher maintenance tips.
Lastly, don’t underestimate the importance of precise coffee scales. They’re not just about measuring dose; their precision determines extraction consistency. Many assume that any digital scale suffices, but a 0.1g accuracy is often needed for high-end brewing. Using a poorly calibrated or low-resolution scale can introduce errors that ruin your shot, especially in specialty coffee brewing. For expert guidance, review barista-grade coffee scales.
Being aware of these hidden nuances and avoiding common traps can dramatically improve your espresso quality. Remember, refining your process isn’t just about buying new gear but understanding the subtle factors that influence every shot. Have you ever fallen into this trap? Let me know in the comments.
As any seasoned barista or dedicated home brewer knows, maintaining your barista tools is crucial for consistent results and longevity. Regular upkeep not only ensures your equipment performs at its best but also prevents costly replacements and flavor inconsistencies. When I first started taking my gear seriously, I realized that even the most expensive espresso tamper or milk pitcher requires routine care to keep it functioning optimally. In this post, I’ll share proven strategies and specific tools I personally recommend to keep your coffee tools working seamlessly over time.
How do I maintain my espresso tamper and milk pitcher for long-term performance?
For espresso tampers, cleaning after each use is non-negotiable. I prefer to wipe my tamper with a damp cloth and occasionally use a mild, non-abrasive cleaner to remove oils or leftover coffee residues. For deeper maintenance, I recommend periodically checking the calibration of your tamper, especially if you notice inconsistency in tamping pressure. Using a calibrated tamper with an adjustable pressure mechanism, as discussed in this insightful guide, can help maintain uniformity in every shot.
Milk pitchers also demand dedicated care. Regular cleaning after each use prevents milk residue from building up and affecting your next pour. Warm water and a soft brush are usually sufficient, but for stubborn stains or odors, a mixture of baking soda and vinegar can work wonders. Reading detailed maintenance tips in this resource has transformed how I care for my pitchers, ensuring they produce perfect milk textures shot after shot. Remember, a clean pitcher not only looks professional but also improves your latte art quality over time.
What advanced maintenance tools should I incorporate into my routine?
For precision tools like coffee scales, professional-grade cleaning includes more than just wiping. I use a small brush and compressed air to remove coffee grounds from crevices, especially around buttons and display panels. Maintaining calibration is equally vital; I calibrate my scale monthly using certified weights, following manufacturer’s instructions, which I’ve detailed in this guide. Regular calibration guarantees your measurements remain accurate, directly impacting your shot quality.
Additionally, investing in tools like silicone cleaning mats and protective covers for your equipment can extend their lifespan. When I noticed my coffee scale was showing inconsistent readings, I switched to a model with a built-in protective case, drastically reducing wear and tear. As the trend toward long-term sustainability grows, many baristas now incorporate ultrasonic cleaners for parts like portafilters and tamper bases. These devices efficiently remove oils and grounds embedded deep in crevices, ensuring your tools stay hygienic and performing at their best.
Stay ahead with proactive maintenance
Preventative care is the cornerstone of reliable equipment. Scheduling weekly cleanings and monthly calibrations for your key tools keeps everything running smoothly. Plus, monitoring the condition of your accessories—checking for cracks, loose parts, or worn-out rubber bottoms—can prevent unexpected equipment failure. For example, replacing worn-out rubber feet on your knock box, as discussed in this article, maintains stability and reduces noise during use.
So, why not elevate your routine? Try calibrating your coffee scale today with a precise weight, or give your milk pitcher a thorough clean using ultrasonic tools. Small steps like these can significantly improve your brewing consistency and equipment lifespan. Remember, maintaining your gear isn’t just about cleanliness—it’s about optimizing performance for every cup. For more detailed maintenance techniques and recommended tools, explore must-have barista accessories and start experimenting with advanced upkeep today!”}]} }
}
3 Lessons I Wish I Learned About Barista Tools Earliest
One of the most valuable realizations in my coffee journey was that investing in quality equipment is only half the battle; understanding how to maintain and use it properly makes all the difference. I once thought a cheap knock box would serve just as well as a premium rubber-bottom model—that mistake led to slipping and noise that disrupted my mornings. I learned that the real secret is in regular upkeep and knowing the quirks of each tool, which transforms routine into artistry.
Another lesson was that even the most calibrated espresso tamper won’t deliver perfect shots if I don’t pay attention to consistent pressure and tamping technique. Tamping isn’t just about pressing down; it’s about finesse and feel, which comes from practice and sometimes, upgrading to a tamper with adjustable pressure. Investing in tools that teach me proper technique has elevated my brewing significantly.
Lastly, I underestimated the importance of cleaning and calibration—both in scales and milk pitchers. I discovered that a scale not regularly calibrated can throw off my entire espresso dose, ruining flavor and extraction. Similarly, a milk pitcher with built-in spouts designed for better latte art made a noticeable difference. Small details like these, when managed well, can turn an everyday coffee into a masterpiece.
Your Coffee Routine Needs These Curated Gems
For anyone serious about elevating their barista game, I recommend exploring precision coffee scales—they’re the backbone of consistent extraction. Quality milk pitchers and tampers are also game-changers—changing the texture of your milk and your tamping uniformity directly impacts flavor and presentation. Lastly, check out knock box strategies to streamline your workflow—speeding up mornings and reducing mess. These tools are reliable investments that make brewing more enjoyable and consistent.
Ignite Your Passion: Time to Take Action
Now is the moment to reexamine your coffee setup and see where small tweaks can produce big results. Whether it’s calibrating your coffee scale, upgrading to a better milk pitcher, or learning proper tamper technique, each step pushes you closer to barista excellence. Remember, consistency is king, and the right equipment paired with diligent maintenance makes all the difference. Embrace these lessons and tools, and watch your coffee craft become more joyful and flavorful. Ready to transform your routine? Share your favorite barista accessory or a challenge you’ve faced—I’d love to hear your story.
Reading this post really hit home for me; I recently switched to a rubber-bottom knock box after experiencing constant slipping on my granite countertop. The difference in stability and noise reduction is remarkable. What I found particularly useful was adding a silicone mat underneath for extra grip during busy mornings. It’s amazing how such small tweaks can make a big difference in workflow efficiency. I have also noticed that some models have heavier bases, which further prevents shifting and creates a more seamless experience. Has anyone experimented with different weights or materials for the base to optimize stability? I would love to hear more tips on choosing the perfect knock box for different countertop surfaces and typical usage patterns.