I’ll never forget the first time I tried to replicate that perfect latte art design. I was so excited, but my milk was frothy yet uneven, and my espresso shot looked like a hurried scribble rather than a work of art. Frustration bubbled up, and I wondered—what am I missing? That lightbulb moment led me down a rabbit hole of exploring the essential tools that can transform a good coffee into a stunning masterpiece. Today, I want to share my journey and how the right milk pitcher and tamper accessories changed everything for me.
Why the right tools make all the difference in coffee art
Think about it. Coffee making is as much about finesse as it is about flavor. The right milk pitcher and espresso tamper accessories help you control the pour, temperature, and pressure—key elements that influence the quality of your latte art. When I finally invested in a high-quality milk pitcher designed for better frothing, everything clicked. Frothing became more consistent, and my pours looked cleaner. The small details in these accessories can elevate your coffee from average to artful. If you’ve struggled with uneven milk foam or inconsistent tamping, trust me, it’s worth diving into this world. And if you’re lost on where to start, I’ve got some tips to help you choose the best gear for your needs.
Is investing in fancy accessories really worth it?
I used to think that fancy tools were just for professionals or those who had money to burn. Until I made the mistake of using a cheap, flimsy tamper that didn’t give me any control. It led to uneven tamping and weak shots. That was a mistake I won’t repeat. As I learned more, I realized that the right accessories are investments in your craft. They help you brew more consistent, higher-quality coffee. And the best part? Once you get the hang of it, your confidence and skills skyrocket.
Now, I’m here to help you avoid those early pitfalls and get you set up with the gear that will truly make a difference. Whether you’re aiming to impress guests or just want to enjoy a perfect cup at home, mastering these tools is a game-changer. Ready to explore what’s out there? Let’s dive into the specifics of the best milk pitchers and tampers that will make your coffee art pop.
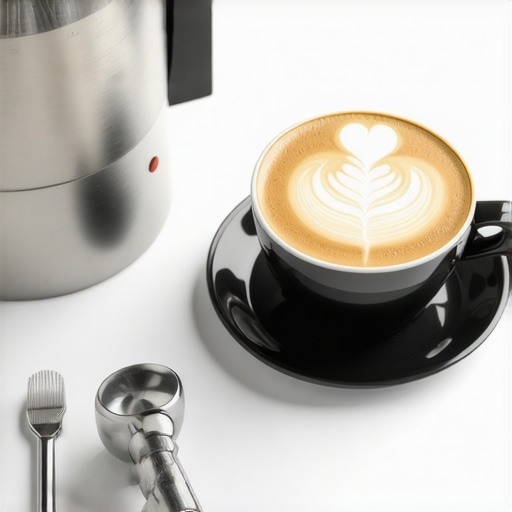
Pick the Right Milk Pitcher for Consistent Frothing
Start by choosing a milk pitcher that fits your hand comfortably and has a narrow spout for precise pours. I once grabbed a generic pitcher that was too wide, making it difficult to control the flow. During my first attempt, the foam splashed everywhere, and my design looked messy. Switching to a well-designed pitcher, like one with a precision spout, made a world of difference. Look for stainless steel pitchers with a good weight and a spout that allows you to direct the milk with ease. For more tips on maintaining your gear, check out how to maintain your milk pitcher.
Master the Art of Frothing Milk with Proper Technique
Frothing milk isn’t just about creating foam; it’s about creating the right texture and temperature. Begin by filling your pitcher to just below the spout, then submerge the steam wand tip just below the milk surface. I remember my first try, where I moved the wand too high, resulting in large bubbles and weak foam. Instead, keep the wand steady and tilt the pitcher slightly to introduce a whirlpool effect, which creates a smooth, shiny microfoam. Practice makes perfect—aim for a velvety texture without large bubbles. This technique ensures your milk pours smoothly for beautiful latte art. Want to perfect your frothing skills? Consider exploring precision coffee scales to ensure your espresso shot is spot-on, setting a perfect stage for your milk.
Perfect Your Tamp for a Flat, Even Surface
An even tamp is crucial to extracting a balanced shot of espresso. Use a high-quality tamper with a comfortable grip and a flat base. When I first started, I pressed too hard, causing uneven compression and a weak shot. Now, I apply consistent pressure—about 30 pounds—using the tamper, then give it a slight twist to distribute the coffee evenly. Think of tamping like pressing down a stamp; firm but controlled. A well-tamped puck ensures uniform extraction, which directly impacts your latte art quality. For detailed tips, visit the best tampers and accessories.
Control Your Pour for Artistic Designs
The secret to stunning latte art lies in your pour technique. Start by pouring from a high height to settle the milk and then lower the pitcher as the foam rises. When you’re ready to create designs, move the pitcher closer to the surface, controlling the flow with your wrist. I once tried a free pour heart, but the foam was too thick, causing the design to collapse. With more control, I learned to pour slowly and steadily, allowing the foam to flow in a thin, continuous stream. Think of your pour as drawing with milk—small, deliberate movements produce the best art. For advanced tips, explore top accessories for milk frothing.
Many coffee enthusiasts believe that investing in high-end accessories guarantees perfect latte art and consistent shots. However, this is a common misconception. The truth is, even the best tools won’t make a barista out of someone who doesn’t understand the nuances of technique. For example, a top-tier milk pitcher alone won’t produce microfoam if you don’t froth the milk correctly. It’s essential to combine quality gear with proper skills. Myth busting is crucial—believing that equipment alone can compensate for technique gaps often leads to frustration and wasted money. Instead, focus on mastering each step, from tamping to pouring, while gradually upgrading your accessories.
Why do many experienced baristas still struggle despite having premium tools?
The secret lies in the hidden nuances of usage. For instance, even the most expensive tamper won’t help if you don’t apply consistent pressure or distribute the coffee evenly. Similarly, a high-quality milk pitcher can’t fix foam that’s improperly steamed or over-whisked. A common trap is over-relying on tools as a shortcut, ignoring the importance of technique refinement. According to coffee expert Scott Rao, the real game-changer is understanding the physics behind extraction and foam formation, which isn’t solely dependent on gear. Using precise scales to measure your coffee and water ratio can reveal subtle issues in your brewing process, often overlooked by casual brewers.
Another overlooked nuance is the timing of your pour. Many assume that pouring slowly or quickly is enough, but the angle, height, and flow control are equally critical. Small adjustments in pour technique can dramatically improve latte art quality. For advanced baristas, understanding the micro-physics of milk microfoam and how it interacts with the espresso shot is vital. This involves controlling temperature, air infusion, and even the shape of the pitcher spout. Precision tools assist in refining these subtleties.
In conclusion, the key to elevating your coffee game isn’t just about acquiring fancy accessories. It’s about understanding the hidden nuances that differentiate a good barista from an exceptional one. Invest in quality gear, but prioritize honing your techniques through practice and knowledge. Don’t fall into the trap of thinking that tools alone will do the job. Instead, see them as enablers for your skills, not replacements. Have you ever fallen into this trap? Let me know in the comments.
Keeping your coffee equipment in top shape is essential for maintaining consistent quality and achieving those stunning latte art designs. Over time, even the best tools can suffer from wear or build-up, which can subtly affect your results. Luckily, with a few targeted maintenance routines and the right accessories, you can ensure your gear continues to perform at its peak. In this post, I’ll share my favorite tools for maintenance, practical tips for longevity, and how to scale your setup as your skills grow.
Extend the Life of Your Milk Pitcher and Tamper
First off, regular cleaning is non-negotiable. For milk pitchers, I swear by using a soft sponge and warm, soapy water after every session. But for a deeper clean, especially if you notice stubborn milk residue or mineral deposits, a dedicated brush or even a vinegar soak can work wonders. For maintaining your milk pitcher, I recommend doing this weekly, to prevent any build-up that could compromise microfoam quality.
As for tampers, the key is to keep the base flat and free of debris. A quick wipe with a damp cloth after each use keeps the surface pristine, ensuring even tamping pressure. If you notice any warped or uneven tampers, replacing them is vital—an uneven tamp can cause inconsistent extraction, which ruins both flavor and visual appeal.
Invest in Quality Calibration Tools
Precision scales are invaluable for maintaining consistency. I personally use the best coffee scales, which allow me to measure coffee dose and water weight down to the gram. This level of accuracy helps dial in your grind size and tamp pressure, directly impacting your shots’ quality and latte art potential. Regular calibration of your grinder and scales ensures your measurements stay accurate, which is crucial as you scale up your setup.
Why Upgrading Your Knock Box Makes Sense
Dealing with used coffee grounds efficiently is part of good maintenance. I recommend using a sturdy, easy-to-clean knock box. Not only does it speed up your workflow, but a well-designed knock box reduces mess and prevents damage to your countertop. As your setup evolves, consider a larger or more durable model that can handle increased use without sacrificing hygiene or convenience.
Long-Term Results Require Consistent Care
Investing in quality accessories is only part of the equation. Regularly inspecting your equipment, replacing worn parts, and cleaning thoroughly will keep your setup performing reliably. Over time, you’ll notice fewer inconsistencies and more beautiful latte art, turning your hobby into a craft. And as your skills improve, don’t be afraid to experiment with different tools—like upgrading to a more precise tamper or a higher-end milk pitcher—to refine your technique even further.
What’s Next for Your Coffee Setup
Looking ahead, I predict that automation and smart calibration tools will become more prevalent, offering even greater consistency with less manual effort. For now, focus on mastering the basics of maintenance and regular calibration, and try out one advanced tip—like using a scale to measure your tamp pressure precisely. It’s a small change that can have a big impact on your results.
Remember, the key to long-term success in coffee art isn’t just about having the right tools—it’s about caring for them diligently. Keep everything clean, calibrated, and well-maintained, and your skills will continue to flourish. Want personalized advice on your setup? Feel free to reach out anytime. Happy brewing!
The Hardest Lesson I Learned About Coffee Art
One of the most eye-opening realizations was that even with top-tier accessories, without consistent technique, achieving stunning latte art is nearly impossible. I used to think that upgrading my milk pitcher or tamper would instantly improve my designs, but I learned that mastery comes from regular practice and understanding the physics of milk frothing and espresso extraction. This lightbulb moment taught me that tools are enablers, not magic solutions.
3 Myths About Coffee Accessories That Held Me Back
I used to believe that expensive equipment was necessary for great coffee art, which led to unnecessary spending. The truth is, even budget-friendly tools can produce excellent results if you learn how to use them properly. Additionally, I thought that once I bought a fancy tamper or pitcher, I could skip practicing technique—big mistake. The real game-changer was investing time in honing my skills alongside quality gear.
What Experts Won’t Tell You About Perfecting Your Pour
Many seasoned baristas emphasize that pouring technique—angle, height, flow—is crucial. What they often don’t highlight is how small adjustments in wrist movement and pour speed can dramatically alter your design. I discovered that filming myself or practicing with a mirror helped me see subtle flaws I hadn’t noticed, leading to better control and more intricate latte art. Remember, patience and observation are your best friends in this craft.
My Essential Toolkit for Coffee Art Progression
For me, a high-quality stainless steel milk pitcher with a narrow spout was a game-changer, enabling precise control. I also swear by a digital scale, which I use to measure my espresso and milk volume—accuracy makes a real difference (more on scales here). A good knock box keeps my workspace clean and ready for the next pour, while a maintenance kit ensures my tools stay in top shape. These investments foster consistency and confidence, pushing my skills further.
Don’t Wait—Your Coffee Journey Starts Now
If you’ve been hesitant to upgrade your gear or doubted your technique, remember that progress is a journey, not a destination. Embrace the learning curve, experiment with different tools, and most importantly, enjoy the process of creating beautiful coffee art. As you refine your skills and maintain your setup diligently, you’ll find that each cup becomes an expression of your passion and patience. So, what’s the one coffee art skill you’re excited to master next? Share below—I’d love to hear your goals and tips!
,