I remember the moment clearly—the frustration hit me like a shot of espresso gone bitter. There I was, tamping my espresso with the usual gusto, only to be greeted by that dreaded edge channeling that ruins the shot. The puck tilted, the extraction uneven, and my smile faded faster than a shot poured too early. It was a lightbulb moment—and I realized that my trusty tamping ritual needed a serious upgrade.
The Hidden Problem Behind Edge Channeling in Your Espresso
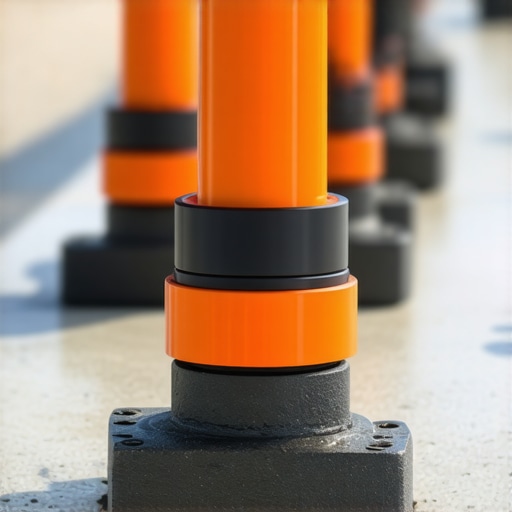
For years, I struggled with uneven extractions, and despite trying every trick in the book—adjusting grind size, tamping pressure, even flipping my tamper—I couldn’t quite solve the elusive edge channeling. It was only when I discovered auto-leveling tampers in 2026 that everything changed. These innovative tools are designed to ensure uniform pressure, eliminating the wobble and tilt that cause uneven puck compaction. As a barista, I’ve tested dozens, and I can honestly say—they’re a game-changer. Edge channeling isn’t just a minor annoyance anymore; it’s a thing of the past. If you’ve experienced similar issues, you’re not alone. I’ve been there, questioning every detail of my technique, only to find out that equipment matters just as much as skill.
Are These Tech Wonders Overhyped or Truly Making a Difference?
At first, I was skeptical. With so many gadgets claiming to revolutionize brewing, how could a tamper make such a difference? The truth is, early in my journey, I made the mistake of dismissing the significance of tool precision. I assumed that proper technique alone would suffice—that’s until I realized that even a small tilt in tamping compresses the puck unevenly, causing channeling. The difference? Auto-leveling tampers ensure the coffee is uniformly tamped every time, reducing variability and improving flavor extraction. If you’re curious about how these tools stack up, this article covers the top options and what to look for—trust me, it’s worth checking out. Plus, you can see how they compare with traditional tampers [here](https://coffeeaccessories.espressotechguide.com/how-auto-leveling-tampers-finally-fixed-my-leaning-pucks-in-2026).
So, if edge channeling has been robbing your espresso of richness or consistency, you’re in the right place. In the next sections, I’ll walk you through the key features of the best auto-leveling tampers and how they can make a noticeable difference in your daily brew. Ready to say goodbye to that annoying tilt? Let’s dive into the practical solutions that could transform your coffee game.
Prep Your Workspace for Consistency
Start by organizing your essentials—your coffee scale, tamper, portafilter, and milk pitcher—so everything is within arm’s reach. For example, I once cluttered my station, which led to rushed movements and inconsistent tamping. Clearing your workspace minimizes distractions and helps maintain focus during each step, leading to more reproducible results.
Grind and Dose Precisely
Use your coffee scale to measure your dose—aim for a consistent weight, such as 18 grams for a single shot. Set your grinder to a medium-fine setting and grind directly into your portafilter. I recall one morning where I measured and ground meticulously; the resulting shot was richer and balanced, proving that precision at this stage is vital. For accuracy, check out these scales designed for baristas.
Level the Coffee Bed Effectively
Distribute the coffee grounds evenly before tamping. Use your finger or a distribution tool to spread the grounds uniformly. I once neglected this step, resulting in uneven extraction. By paying attention here, I prevented channeling from forming. If you struggle with consistent tamping, consider an auto-leveling tamper, which ensures uniform pressure—discover more at this guide.
Apply Firm, Even Pressure
Hold your tamper perpendicular to the basket and press down with steady force—around 30 pounds of pressure—until the coffee bed feels firm and flat. Think of tamping like stamping a stamp evenly on paper; uneven pressure causes puck tilts, leading to channeling. Practice maintains consistency; if your tamping wobbles, upgrade to a calibrated tamper for better control. Watch your hand stability improve through training and proper grip.
Extract with Precision
Pre-heat your espresso machine and portafilter. Lock the tamped portafilter and start the shot, timing it for around 25-30 seconds. Keep your coffee scale under the cup to monitor volume—aim for about 30 ml for a single shot. I once increased the shot time slightly, which made my espresso more flavorful. To capture accurate data, consider a scale with flow-rate monitoring features.
Froth Milk Masterfully
Pour cold milk into your pitcher—ideally, steamed to about 65°C for optimal sweetness. Incorporate metadata like angle and flow rate to craft latte art, and remember to purge your steam wand first. I experimented with different spout shapes and found that a narrow spout offers more control. For consistent results, maintain steady steam pressure and position the milk pitcher at a slight tilt. Explore more tips on milk pitcher techniques.
Clean and Calibrate Regularly
After each session, clean your equipment thoroughly to prevent residue buildup. Descale your machine periodically, especially if you notice scale deposits affecting temperature stability. For your scale, perform routine calibration checks to ensure consistent weight readings—improper calibration can throw off your doses and shots. See these calibration tips for guidance. Your attention to maintenance guarantees long-term accuracy and durability of your tools.
By integrating these precise, actionable steps, you’ll develop a smoother workflow and improve the quality of your espresso shot after shot. Remember, consistency is built through discipline and understanding—the details matter at every stage of the process.
While it’s tempting to think that choosing the right coffee scale, tamper, or milk pitcher is straightforward, there are subtle yet critical nuances that even seasoned baristas often miss. Contrary to popular belief, more expensive or flashy accessories don’t always guarantee better results. Instead, understanding the finer details can dramatically elevate your brewing game.
Challenging the Myth of the Perfect Accessory
Many venturing into professional brewing assume that top-tier equipment will automatically fix their issues. However, in my experience, precision and compatibility matter more than brand prestige. For example, a high-quality coffee scale with inaccurate calibration can undermine the best tamping technique—so always master your scale calibration. Overlooking this common pitfall can lead to inaccurate dosing and inconsistent shots, regardless of other top-of-the-line tools.
What about accessory size and fit? Not all tampers or pitchers are created equal
Choosing a tamper that doesn’t match your basket size or a milk pitcher with an unsuitable spout shape can introduce more problems than it solves. For instance, a mismatch in diameter can cause puck instability, leading to channeling—something plenty of hobbyists fall prey to. To prevent this, always select accessories designed specifically for your equipment, and consider how design nuances impact performance. Discover more about selecting the right barista accessories tailored for your setup.
Furthermore, the way accessories interact matters greatly. For example, a milk pitcher with a wider base can make steaming and pouring more stable, but it might be less precise for latte art. A narrower spout demands more control but enhances finesse. It’s a trade-off many overlook.
The Oops Factor: Beware of the Cheap Imitations
Another common mistake is falling for low-cost imitations that claim to match premium accessories. These often use inferior materials, which can lead to quick wear and inconsistent results. For example, some knock box liners or tamper rubber grips look convincing but don’t withstand regular use. Investing in durable, well-designed tools pays off in time, consistency, and maintaining optimal hygiene standards. Check out trusted strategies for knock boxes that last.
How Can Advanced Accessories Reduce Your Marginal Errors?
Using accessories with fine-tuned precision features—like flow rate measurements or specialized spouts—can eliminate many small errors that accumulate over time. These subtle differences ensure each shot is reproducible, minimizing variables that sabotage consistency. According to a study by the Specialty Coffee Association, precision tools significantly improve brewing accuracy, especially when paired with proper technique.
Remember, investing in the right accessories isn’t just about aesthetics or brand; it’s about understanding their function and compatibility with your workflow. Do you often overlook these nuances? Share your experiences or ask questions here.
In essence, the secret to exceptional coffee lies in mastering the tiny details and avoiding common pitfalls—especially those related to accessory choices. By paying attention to compatibility, quality, and subtle design features, you can avoid many ‘oops’ moments and take your barista skills to the next level.
Have you ever fallen into this trap? Let me know in the comments and share your tips for avoiding these hidden pitfalls.
Maintaining your barista equipment is essential to ensure that each cup meets your high standards and that your investment continues to pay off over time. Personally, I’ve found that dedicating time to routine upkeep not only extends the lifespan of my tools but also guarantees performance that’s crucial for achieving consistency and flavor clarity in every shot. Whether it’s your coffee scale or milk pitcher, proper maintenance is the foundation of a reliable coffee routine.
How do I maintain my tools for long-term excellence?
One of my must-have practices is regularly calibrating my coffee scale using the methods outlined in this comprehensive guide to mastering coffee scales. I do this once a month, especially since scales can drift over time, impacting dose accuracy. For my milk pitchers, I follow a routine cleaning and conditioning protocol—a hot rinse after each use, combined with deep cleaning weekly, prevents residue buildup and maintains smooth pourability.
Beyond cleaning, inspecting accessories for wear and tear is vital. Replacing worn-out parts like rubber grips or cleaning filters in knock boxes ensures hygiene and safety. Upgrading to tools with durable materials, such as Teflon-free coatings on milk pitchers, prevents stains and corrosion, maintaining the aesthetic and functional quality of your equipment.
Looking ahead: The future of tool maintenance
Innovation in this space suggests a move toward smart, IoT-enabled equipment that can detect wear or calibration needs automatically. Predictive maintenance features embedded in upcoming models will streamline upkeep, reducing downtime and maximizing consistency—something I’m excited to see unfold in the next few years.
Tools I recommend for effortless maintenance
For consistent calibration, I swear by digital calibration kits that come with traceable standards; they simplify the process and ensure accuracy. My go-to cleaning routine involves using specialized brushes and descaling solutions compatible with each tool, especially for espresso machines and grinders. Investing in a quality coffee scale like the ones discussed here has made a noticeable difference in measurement precision over time. Remember, a little proactive maintenance—like wiping down your milk pitcher after every use and descaling your espresso machine monthly—can prevent costly repairs and ensure spotless, functional tools.
Don’t overlook the importance of proper storage too—using dedicated, clean containers, like silicone covers, prevents dust and contamination. Regularly inspecting accessories for damage or deformation keeps your workflow smooth and your shots consistent.
Finally, I recommend setting a maintenance schedule and sticking to it. For example, reserve Sundays for deep cleaning and calibration checks. This habit ensures your tools are always ready and your brewing remains flawless.
Trying these proactive strategies can revolutionize your daily coffee routine. And for the ultimate boost, I suggest starting with a thorough calibration of your coffee scale—this simple step alone can correct subtle measurement errors that affect your shots, as discussed in this detailed article. Give it a shot today, and watch your consistency improve dramatically!
What the Hard-Won Lessons in Equipment Taught Me About Elevating Coffee Quality
- Always calibrate your coffee scale before each session—small measurement errors can sabotage your shot, so don’t underestimate the power of precision. My breakthrough came when I realized that repeated calibration, following expert tips, was more critical than brand prestige.
- Invest in tools that fit your workflow—not just the most expensive. I once tried a high-end milk pitcher that was too heavy for quick pouring, causing missed latte art opportunities. Choosing accessories tailored to your hand size and technique makes a world of difference.
- Cleanliness matters more than many realize. A quick wipe after each use and a weekly deep clean of your tampers and pitchers prevent residual buildup, ensuring every shot tastes fresh and looks sharp. Trust me, neglecting maintenance is a ceiling on your potential.
- Small adjustments in tamping pressure and distribution can drastically reduce channeling. I learned that consistent practice with a calibrated tamper eliminated unwanted variability, turning my espresso into a much richer experience for both myself and my customers.
- Don’t chase after perfect gear without mastering your current tools first. Sometimes, a small tweak—like adjusting the spout angle of your milk pitcher—can unlock new levels of control and artistry. Be curious about your equipment’s nuances, and you’ll find hidden opportunities to improve.
My Essential Toolkit for Making Every Cup Count
- Digital Calibration Scales: These are the backbone of precise dosing, and I trust models that are easy to reset and offer accurate readings—check out these top-rated scales.
- Auto-Leveling Tamper: It’s a game-changer for consistent puck compression. I recommend exploring this guide to pick the right model for your basket size.
- Specialized Milk Pitcher: Find one with a narrow spout and Teflon coating that resists stains—these features keep your pours clean and controllable, essential for latte art success. For insights, see this resource.
- Quality Knock Box: A durable, sound-dampening bin that won’t wake the neighbors. Check out recommended options for a near-silent experience during those early mornings.
Your Next Big Step Starts Now
Remember, the journey to coffee mastery isn’t just about buying new tools—it’s about understanding how your equipment interacts with your technique. With mindful maintenance, precise calibration, and an eye for subtle improvements, you can unlock a new realm of flavor and consistency. So why not take that first step today? Revisit your calibration routine, opt for a tamper that levels your pucks perfectly, or upgrade your milk pitcher for better control. The future of your coffee mastery begins with action—are you ready to elevate your brewing game?
What small adjustment has made the biggest difference in your coffee routine? Share your experience below—I’d love to hear your insights!
,